


USING MACHINE LEARNING TO DETECT STREET ART ON INSTAGRAM
What if you could pump all of the Instagram photos of Banksy’s artwork into a program that could pinpoint where the next one’s likely to be?
Well, we aren’t there quite yet, but there’s still some really cool stuff you can accomplish using image analysis and machine learning to better understand street art.
You can use machine learning models to detect whether an Instagram photo contains street art — even classify the type of street art. For example, you can make a classifier for stencil art, letterform, portrait murals, or mixed medium installations.
In this article, I will go over how to build a deep learning model using TensorFlow and Keras that accomplishes the task of generally detecting street art by using publicly available social media data on Instagram.
To my knowledge, there isn’t a publicly available dataset of street art or graffiti. But we’ll go over a few simple techniques for creating datasets from publicly available images on the Internet and social media — which will soon become indispensable tools in your machine learning toolkit. After reading this article, you’ll be able to leverage these methods to generate your own datasets for anything you need.
We’ll also learn how to build a TensorFlow model using Keras trained on our street art dataset. Then we will use this deep learning model to detect if new images contain street art photos.
| Just pick an Instagram hashtag, grab some images, and train your deep learning model.
In the future, nearly everything will be photographed, and indirectly analyzable with machine learning. Learning how to train models to analyze this content yourself and understand the results is a superpower worth cultivating.
// Overview of our Instagram street art dataset and model
Here’s a quick overview of our process:
- Build a street art deep learning image dataset using hashtag results for
#streetart - Use the images to build a deep learning model that will predict if images contain street art
- Clean the dataset and retrain the model for improved results
We’ll follow these three steps to build a real functioning model for classifying street art.The model here is based on the “Deep Residual Learning for Image Recognition” (2015) paper’s ResNet model and can be duplicated using other architectures.
You can view the finalized codebase in this Github repository. You can also open up the codebase (including the datasets I’ve collected) on FloydHub in a JupyterLab Workspace by clicking this button:
// Building the image dataset
Let’s recap our goal. We want to build a TensorFlow deep learning model that will detect street art from a feed of random images. We will start will pulling hash-tagged images that offer a good preliminary dataset of street art. Then, we will use the same method for pulling images to train against that is not street art, but may resemble the images that we will encounter. Using the two sets of images, we will train our model and be able to classify whether images do or don’t contain street art.
The Internet is full of places to gather data to train models. If you are looking for specific images, Google image searches offer an unbeatable way to get numerous images one a single subject. PyImageSearch provides an excellent guide on building a deep learning dataset using Google images.

Although the Google results method is straight forward, we want to emulate the process of building a model from social media data. As a result, we will train directly on the data source of choice: Instagram.
The same method discussed in the blog post linked above could be used for us. Simply load up Instagram’s web interface, search for the terms you want, then download all the images loaded in the browser.
We will go about it a little differently, in that we will use a library that simulates this process for us. While the method discussed below in one way to accomplish this, it is far from the only way.
If you want to skip downloading the street art images yourself, and just download a sample dataset, then skip to the next section titled: “Prepare your dataset”.
// Getting street art images
We will be using a Python library called Instaloader that provides an easy interface for setting a hashtag or location point. In the process, it will use the rate-limited interval and download images needed to train our model.
Details of the library can be found here: https://instaloader.github.io
Let’s start by setting up our Python environment and installing instaloader.
pip install instaloader
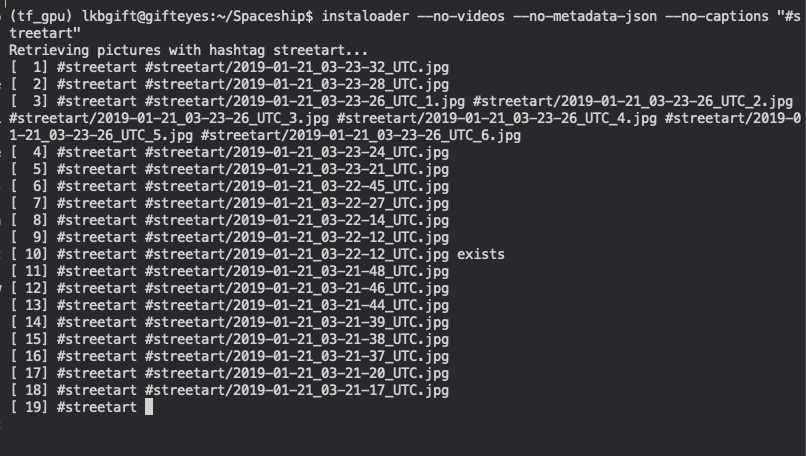
Thats all we need to get our library working. Next we will get our own street art image dataset for training our model. The instaloader library will do the command line command below:
$ instaloader --no-videos --no-metadata-json --no-captions "#streetart"
This command can be better understood by reviewing the instaloader docs:
In short, we will be downloading images that have the hashtag “streetart”. We don’t want to download videos. The instaloader library will download the image’s caption data and metadata by default, so we also pass flags to prevent this.
In an alternative use case, we could also download the metadata associated with each image to collect the image’s respective longitude and latitude points. This would allow us to associate images with a specific location. Not all images have this metadata, but the downloaded data is still a good start. Definitely something that’s worth exploring in a future project!
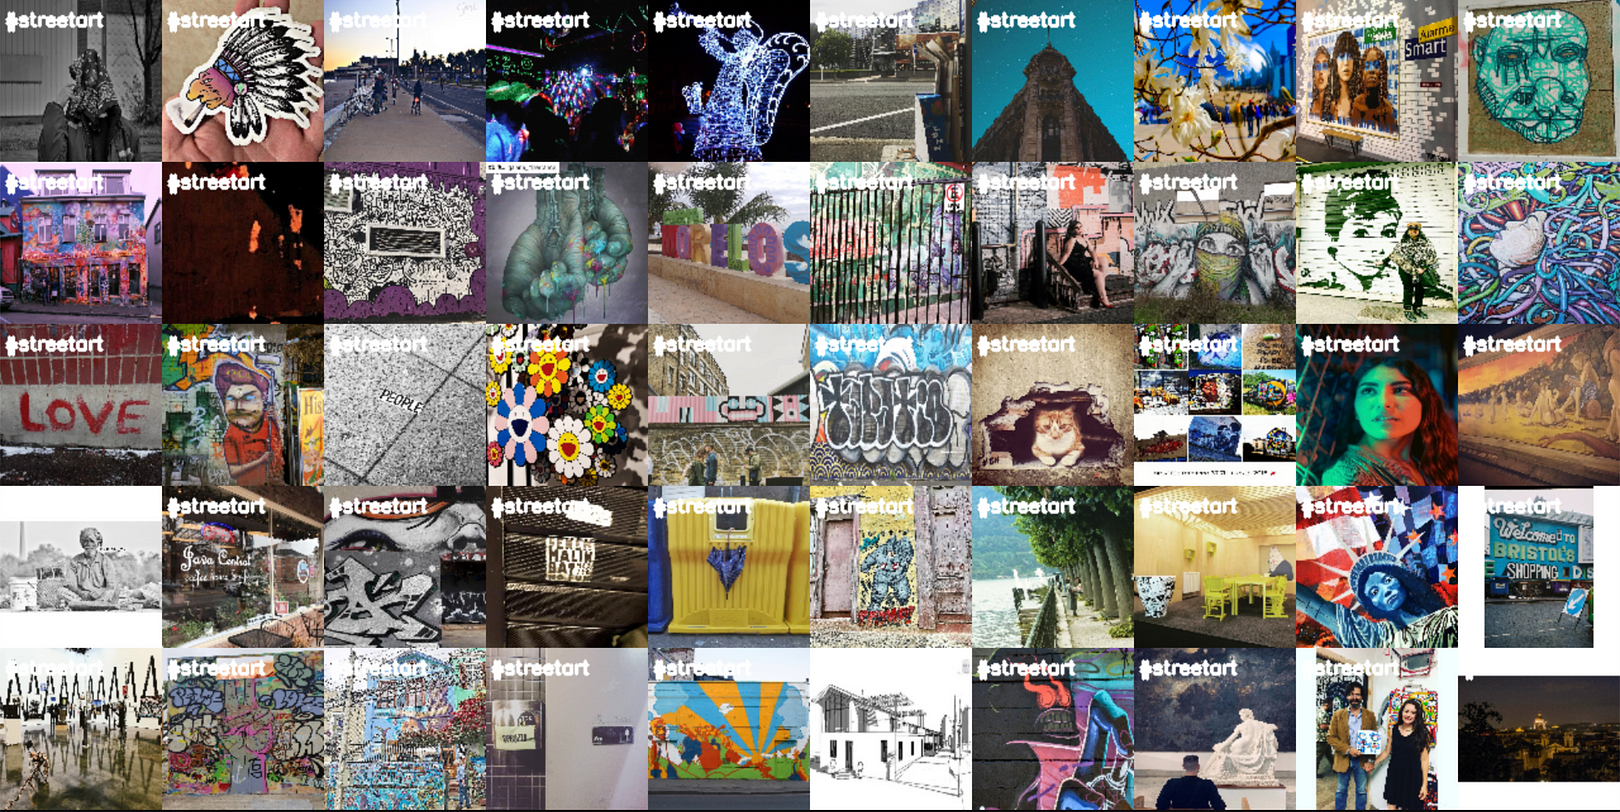
Once the command above runs, you will see the command slowly downloading images into a newly created folder called /#streetart. Once you have enough images (approximately 1000 is a good base), then you can stop the command.
// Getting images to compare against

Next, we need to download images that are not street art related. This dataset will determine the environment in which our model will perform best. If we train against a series of identical types of images, such as pictures of cats or dogs, then our model will not be refined when deployed in a production environment.
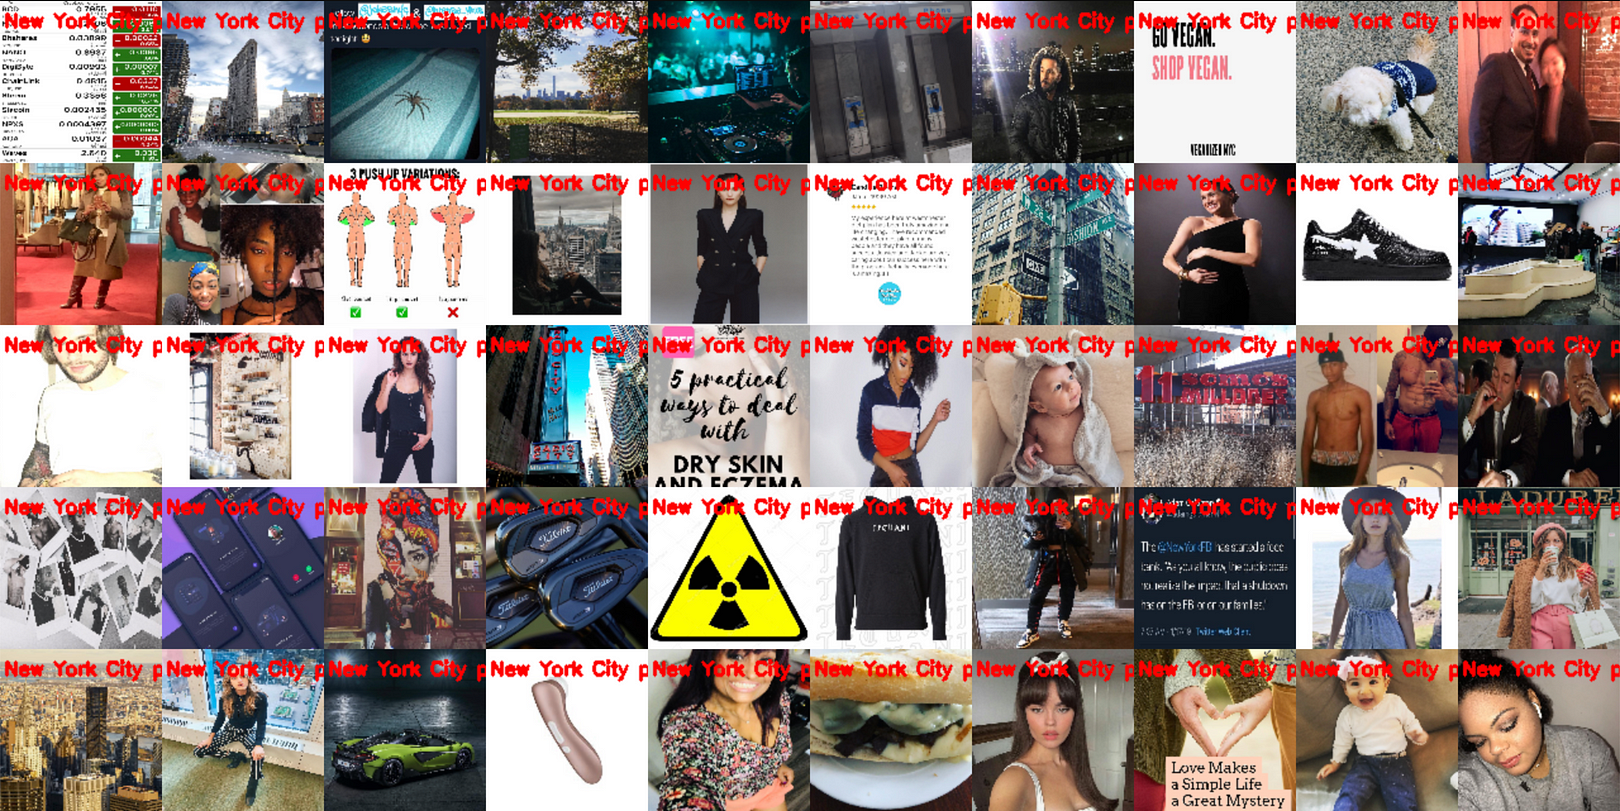
In our hypothetical final case, we would like our model to perform well when classifying images from a location feed, so we will pull images from a city: New York. This will also be helpful as our models trains, because the image set from New York will contain content that will help the model differentiate certain urban subjects from the street art content.
Please note, when you use the method above, you will get a wide range of images. Due to forces beyond our control, some of these images may be not safe for work. 😬
To download images for a specific location, you must first find the location’s id. To find this, you can log into the Instagram web interface and do a search for the location you want. The URL will populate with the location’s ID, as seen below:
https://www.instagram.com/explore/locations/212988663/new-york-new-york/
As seen in the URL above, the New York location id is: 212988663. Using this location id, now initiate a new instaloader query:
$ instaloader --no-videos --no-metadata-json --no-captions "%212988663"
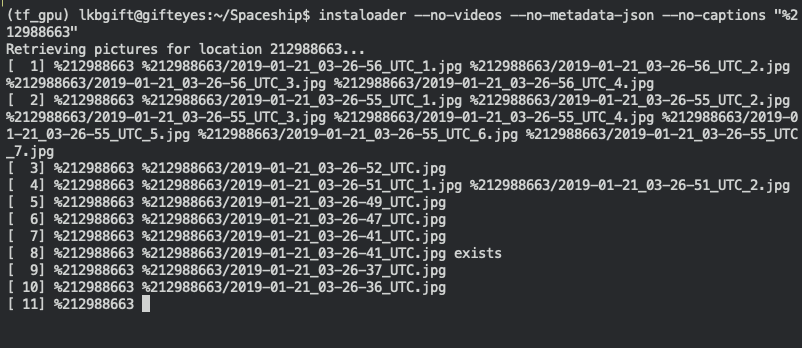
Similar to before, the command above will download images from the location id of choice, without any extra files. Let this process run for as long as you ran the previous command, so you have an even number of images in your two image sets.
// Prepare your dataset
If you followed the instructions above, you should have two directories titled /#streetart or /%212988663 respectively. First, because navigating non-alphanumeric in file names is a pain in the butt, lets rename those directories /streetart and /not_streetart respectively.
Now create a folder called /images and move the two folders. Your file directory should look like this:
.
└── dataset
  └── images
    ├── not_streetart
    └── streetart
If you didn’t follow the instructions above, you can download the dataset I’ve already prepared from FloydHub here:
https://www.floydhub.com/rememberlenny/datasets/streetart-notstreetart/
You can also run the corresponding Python notebook in a FloydHub Workspace. This will let you easily follow along with the model training code in Jupyter Notebook workspace.
Now that we have our images to train with, we need a way to break them up into the proper training, validation, and test sets. We can do this with the following script pulled from Adrian Rosebrock’s build script:
Code is adapted from Rosebrock’s build_dataset.py:
import random
import shutil
import os
from imutils import paths
# Set up paths for original images and training/validation/test
ORIGINAL_IMAGES = "dataset/images"
TRAINING_PATH = "dataset/training"
VALIDATION_PATH = "dataset/validation"
TESTING_PATH = "dataset/testing"# Define the percentage of images used in training (80%),
# and the amount of validation data
TRAINING_SPLIT = 0.8
VALIDATION_SPLIT = 0.1First we start with our imports and setting constants. imutils is a useful library created by Rosebrock for easy file and path manipulation.
# Access and shuffle original images
imagePaths = list(paths.list_images(ORIGINAL_IMAGES))
random.seed(42)
random.shuffle(imagePaths)
# Compute the training and testing split
i = int(len(imagePaths) * TRAINING_SPLIT)
trainingPaths = imagePaths[:i]
testingPaths = imagePaths[i:]# Use part of the training data for validation
i = int(len(trainingPaths) * VALIDATION_SPLIT)
validationPaths = trainingPaths[:i]
trainingPaths = trainingPaths[i:]# Define the datasets
datasets = [
("training", trainingPaths, TRAINING_PATH),
("validation", validationPaths, VALIDATION_PATH),
("testing", testingPaths, TESTING_PATH)
]Next, we prepare our image files into the various training, validation and test sets. This allows us to have a unique set of images that are used for training and validation, then separately for testing.
for (dType, imagePaths, baseOutput) in datasets:
  # If output directory doesn't exit, create it
  if not os.path.exists(baseOutput):
    os.makedirs(baseOutput)

  # Loop over the input image paths
  for inputPath in imagePaths:
    # Extract the filename of the input image along with its
    # corresponding class label
    filename = inputPath.split(os.path.sep)[-1]
    label = inputPath.split(os.path.sep)[-2]
    # Build the path to the label directory
    labelPath = os.path.sep.join([baseOutput, label])
    # If label output directory doesn't exist, create it
    if not os.path.exists(labelPath):
      os.makedirs(labelPath)
# Construct the path to the destination image and then copy
# the image itself
p = os.path.sep.join([labelPath, filename])
shutil.copy2(inputPath, p)Finally, we should copy our training, validation and testing datasets in their own respective directories.
// Dataset prep summary
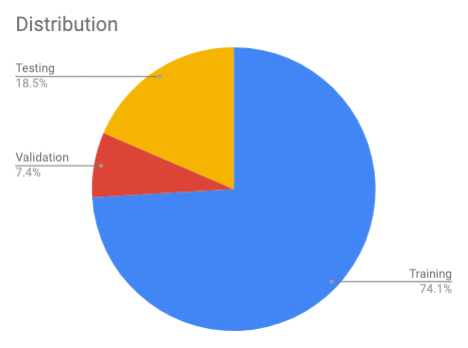
To summarize, the script checks for your images in /dataset/images, then does the following:
- Load all the original downloaded images into memory, and shuffle them around to be in a random order.
- Split up the images into a following set: 80% reserved for training (10% of which will be for validation) and then the remaining 20% will be for testing.
- Make the respective directories and move images into
/dataset/training,/dataset/validation, and/dataset/testing.
Note: All of your original images will stay in the /dataset/images folder.Once your dataset is split up, your images are ready to be used for training.
// Train your deep learning model
Now we will use our dataset to train our model. Our deep learning model will be trained using Keras with a ResNet based CNN architecture.
The training code below is primarily taken from lessons in the Deep Learning for Computer Vision with Python book and, as you might have already guessed at this point, the PyImageSearch blog by Adrian Rosebrock. I really enjoy his blog and can’t recommend it enough for concrete code examples and practical tutorials. As a result, much of the points below will be summary points and a link to the final code.
Code is adapted from Rosebrock’s save_dataset.py, which we will call train_model.py.
from keras.preprocessing.image import ImageDataGenerator
from keras.optimizers import SGD
from pyimagesearch.resnet import ResNet
from sklearn.metrics import classification_report
from imutils import paths
import numpy as npNUM_EPOCHS = 30
BATCH_SIZE = 32TRAINING_PATH = "dataset/training"
VALIDATION_PATH = "dataset/validation"
TESTING_PATH = "dataset/testing"
MODEL_NAME = "streetart_classifer.model"# Determine the total number of image paths in training, validation,
# and testing directories
totalTrain = len(list(paths.list_images(TRAINING_PATH)))
totalVal = len(list(paths.list_images(VALIDATION_PATH)))
totalTest = len(list(paths.list_images(TESTING_PATH)))To start, we will import our dependencies and assign our constants.
We will be using Keras as our training library because it’s simple and provides a thorough API for our needs. The same steps could be replicated with other deep learning libraries like PyTorch and the fast.ai library. Keras provides a simple, module neural network library that can flexibly use various other machine learning frameworks as its backend. In my case, I will be using it with TensorFlow, but that shouldn’t matter. One note about Keras is it doesn’t support multi-GPU environments by default for training a network.
Note the pyimagesearch.resnet import: this is a folder containing our Keras implementation of our ResNet architecture.
# Initialize the training training data augmentation object
trainAug = ImageDataGenerator(
  rescale=1 / 255.0,
  rotation_range=20,
  zoom_range=0.05,
  width_shift_range=0.05,
  height_shift_range=0.05,
  shear_range=0.05,
  horizontal_flip=True,
  fill_mode="nearest")

# Initialize the validation (and testing) data augmentation object
valAug = ImageDataGenerator(rescale=1 / 255.0)
Unlike the ImageNet or COCO, our dataset is relatively small. Because “street art” comes in many shapes, sizes, colors, and in a variety of environments, we will use data augmentation to help improve our training. Using the Keras image preprocessing API, we will create data augmentation objects to generate new images from our dataset with random modifications.
To learn more about data augmentation, see the Keras API documentation or take a look at a great blog post on data augmentation.
# Initialize the training generator
trainGen = trainAug.flow_from_directory(
  TRAINING_PATH,
  class_mode="categorical",
  target_size=(64, 64),
  color_mode="rgb",
  shuffle=True,
  batch_size=BATCH_SIZE)

# Initialize the validation generator
valGen = valAug.flow_from_directory(
  VALIDATION_PATH,
  class_mode="categorical",
  target_size=(64, 64),
  color_mode="rgb",
  shuffle=False,
  batch_size=BATCH_SIZE)

# Initialize the testing generator
testGen = valAug.flow_from_directory(
  TESTING_PATH,
  class_mode="categorical",
  target_size=(64, 64),
  color_mode="rgb",
  shuffle=False,
  batch_size=BATCH_SIZE)
Once the augmentation objects are setup, we will generate the new images on the fly for our training, validation, and testing datasets.
# Initialize our Keras implementation of ResNet model and compile it
model = ResNet.build(64, 64, 3, 2, (2, 2, 3),
  (32, 64, 128, 256), reg=0.0005)
opt = SGD(lr=1e-1, momentum=0.9, decay=1e-1 / NUM_EPOCHS)
model.compile(loss="binary_crossentropy", optimizer=opt,
  metrics=["accuracy"])

# Train our Keras model
H = model.fit_generator(
  trainGen,
  steps_per_epoch=totalTrain // BATCH_SIZE,
  validation_data=valGen,
  validation_steps=totalVal // BATCH_SIZE,
  epochs=NUM_EPOCHS)

# Reset the testing generator and then use our trained model to
# make predictions on the data
print("[INFO] evaluating network...")
testGen.reset()
predIdxs = model.predict_generator(testGen,
  steps=(totalTest // BATCH_SIZE) + 1)

# For each image in the testing set we need to find the index of the
# label with corresponding largest predicted probability
predIdxs = np.argmax(predIdxs, axis=1)
# show a nicely formatted classification report
print(classification_report(testGen.classes, predIdxs,
  target_names=testGen.class_indices.keys()))
We build, compile, and train our ResNet model using the augmented street art dataset. Our training script will make predictions on the test dataset, then index the highest probability class on each prediction.
# Save the neural network to disk
print("[INFO] serializing network to '{}'...".format(MODEL_NAME))
model.save(MODEL_NAME)
The final results will be stored in a model named streetart_classifer.modelwhich we can then deploy to classify new street art.

// Training summary
In summary, the training script does the following:
- Import the various preprocessing services and helper utilities from libraries such as Keras. Also assign our constant values that we will use to access our dataset.
- Set up data augmentation objects to prepare our small dataset for training our deep learning model.
- Prepare our data augmentation objects to process our training, validation and testing dataset.
- Build, compile and train our ResNet model using our augmented dataset, and store the results on each iteration.
- Finally, save the trained model.
// Using our trained street art model to classify new Instagram photos
Now that you have a model that detects street art effectively, we can see how it works on real images.We will use the following code below to evaluate the model against an image, and then render the results onto the image with the OpenCV python library.
from keras.preprocessing.image import img_to_array
from keras.models import load_model
import numpy as np
import random
import cv2
from imutils import build_montages
from IPython.display import Image
Assuming this is a new environment, first we load our libraries. We will use the Keras load_model function to use our newly created model and also load in some utility libraries for testing the model on a random sets of data. One convenient utility library, imutils provides a function that easily renders an image montage when fed a list of images.
MODEL_NAME = 'save_model.model'
MONTAGE_FILENAME = 'streetart_photo.png'
IMAGES_PATH = 'dataset/testing'
model = load_model(MODEL_NAME)imagePaths = list(paths.list_images(IMAGES_PATH))
random.shuffle(imagePaths)
imagePaths = imagePaths[:1]# initialize our list of results
results = []Now we will set our constants referencing our model, rendered image name, and sample image path.
If we are in a Python Jupyter Notebook, we don’t need to load the model again.We will then load our test image path and randomly select an image to load. In the imagePaths[:1] definition, the 1 determines how many images to load, and can be increased according to the next part.
# loop over our sampled image paths
print("[INFO] evaluating model against test set...")
for p in imagePaths:
        # load our original input image
        orig = cv2.imread(p)
# pre-process our image by converting it from BGR to RGB channel
# ordering (since our Keras mdoel was trained on RGB ordering),
# resize it to 64x64 pixels, and then scale the pixel intensities
# to the range [0, 1]
image = cv2.cvtColor(orig, cv2.COLOR_BGR2RGB)
image = cv2.resize(image, (64, 64))
image = image.astype("float") / 255.0 # order channel dimensions (channels-first or channels-last)
# depending on our Keras backend, then add a batch dimension to
# the image
image = img_to_array(image)
image = np.expand_dims(image, axis=0) # make predictions on the input image
pred = model.predict(image)
print(pred)
not_street_art_probability = pred.item(0)
street_art_probability = pred.item(1)
pred = pred.argmax(axis=1)[0] # an index of zero is the 'Not street art' label while an index of
# one is the 'Street art found' label
label = "Not street art ({0})".format(not_street_art_probability) if pred == 0 else "Street art found ({0})".format(street_art_probability)
color = (255, 0, 0) if pred == 0 else (0, 255, 0) # resize our original input (so we can better visualize it) and
# then draw the label on the image
orig = cv2.resize(orig, (800, 800))
cv2.putText(orig, label, (3, 20), cv2.FONT_HERSHEY_SIMPLEX, 0.5,
color, 2) # add the output image to our list of results
results.append(orig)We will loop over the images in our test file paths. If we only load one image, this is redundant. We load the image and invoke our model’s predictfunction to get the probability score for the image containing street art. The array we get back has the “Not street art” score at index zero, and “Street art found” score on index one.
We generate a new image and apply text using OpenCV’s putText method. The text contains the image’s predicted label and the respective probability score.
Once the image is created, we append it onto the results array.
montage = build_montages(results, (800, 800), (1, 1))[0]
cv2.imwrite(MONTAGE_FILENAME, montage)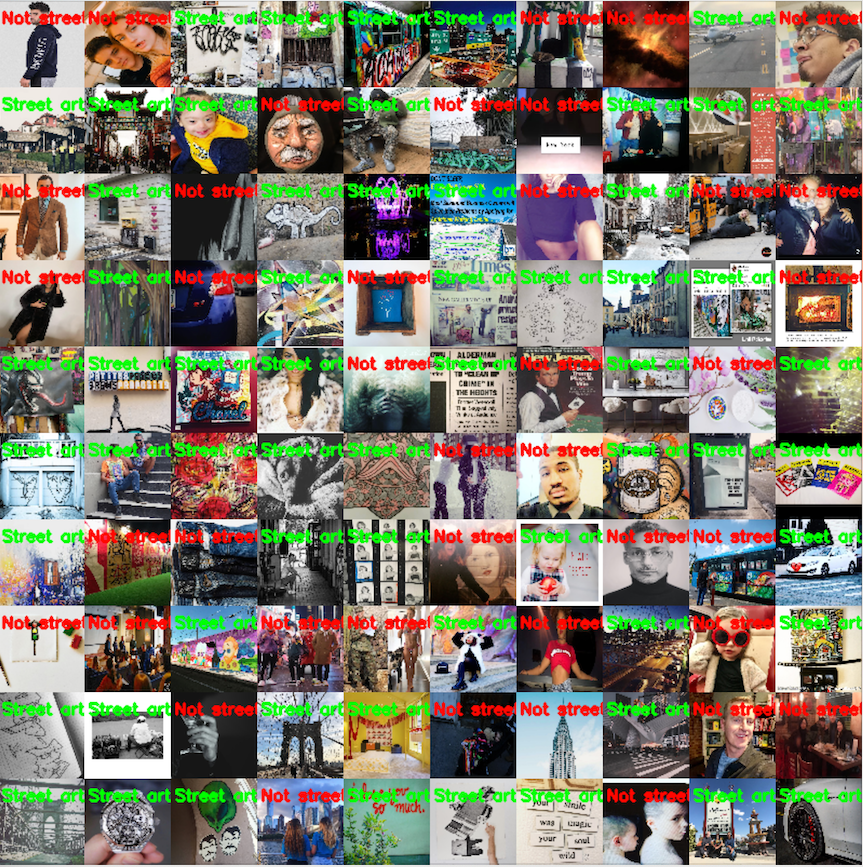
img = cv2.imread(MONTAGE_FILENAME)Image(filename=MONTAGE_FILENAME)Finally, we use the build_montages library to render the images in the results array to create a montage. You can learn about the build_montages function here. In our example, we are only rendering one image, but the third parameter for build_montages can be changed to determine the number of rows and columns of images to render from the image array source. This is what I used to make the large montage of labeled images earlier in this post.
For reference on using build_montages, you can see another example of using the build_montage function below:
# Example for using build_montage, and not part of the street art model evaluation
import cv2
from imutils import build_montages
IMAGES_PATH = 'dataset/testing'
imagePaths = list(paths.list_images(IMAGES_PATH))
imagePaths = imagePaths[:3]
img_list = []for p in imagePaths:
# load our original input image
orig = cv2.imread(p)
img_list.append(orig)# convert image list into a montage of 256x256 images tiled in a 3x1 montage
montages = build_montages(img_list, (256, 256), (3, 1))# iterate through montages and display
for montage in montages:
cv2.imshow('montage image', montage)
cv2.waitKey(0)Now back to the model evaluation.
We store the resulting montage as an image and then use the IPython helper function to render the image. If we run this script as an independent file, we could also invoke the OpenCV image display function.
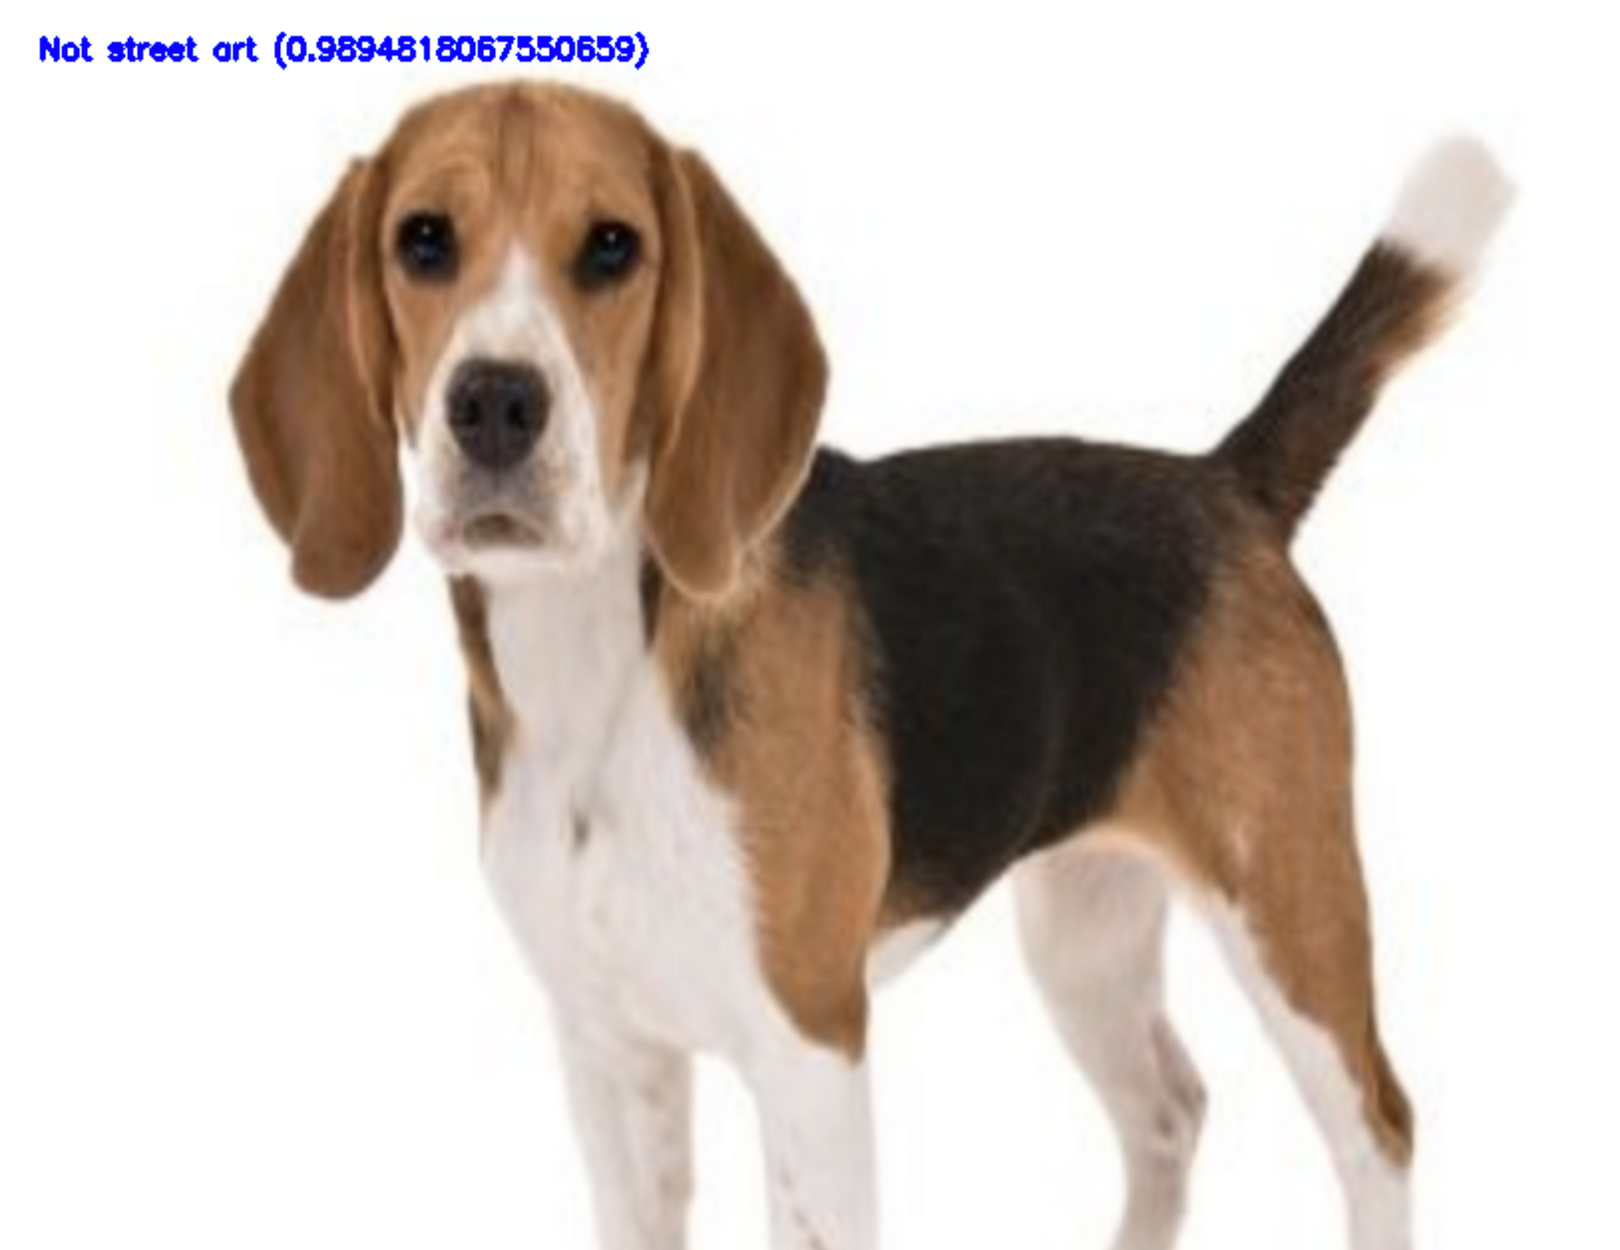
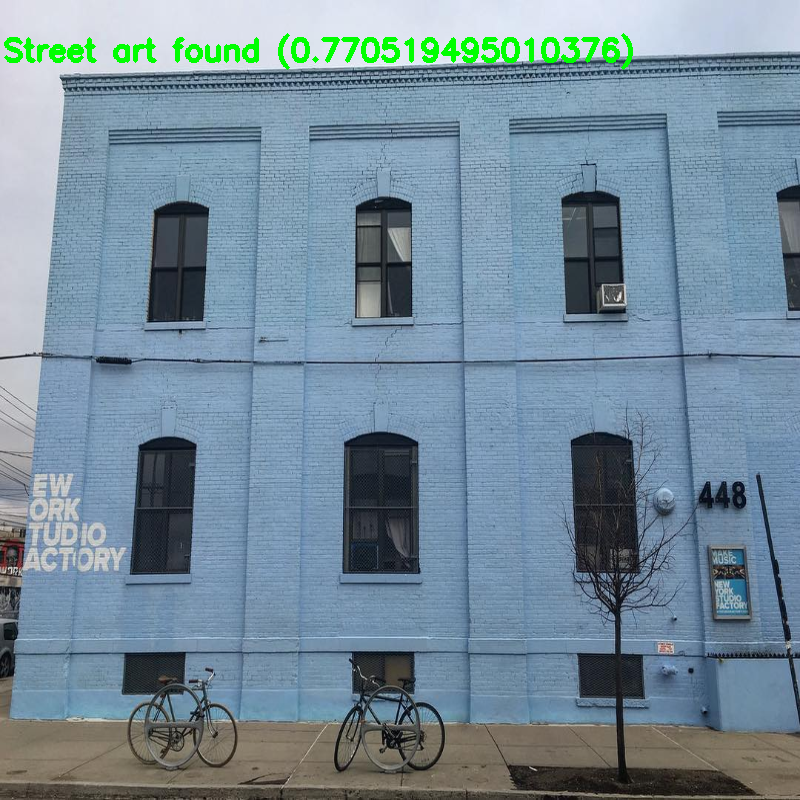
The images below are three examples of running the model evaluation code. I ran the notebook with the code and saved the images from the notebook as a file.
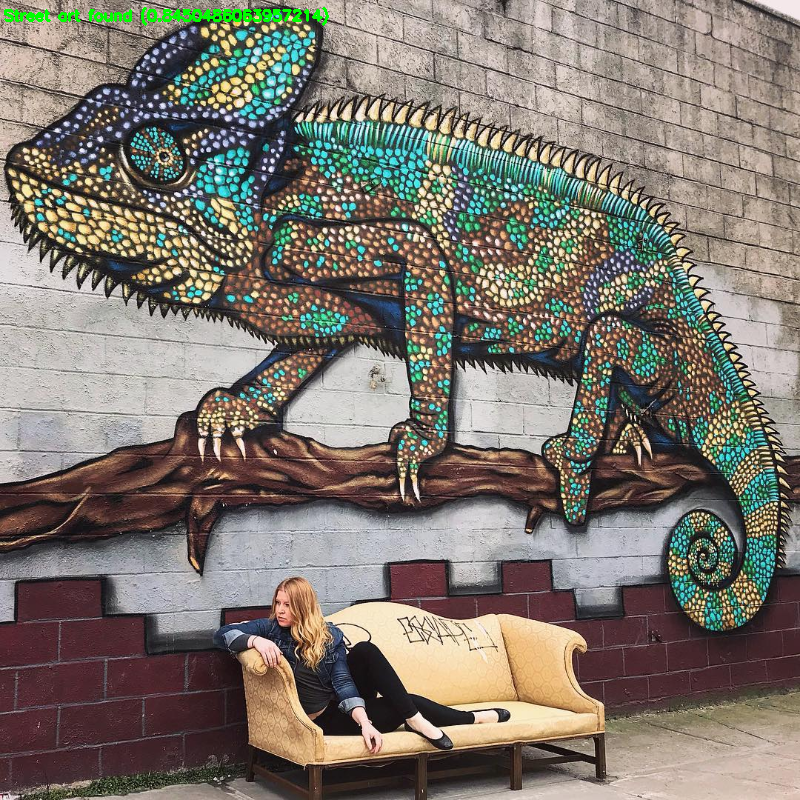
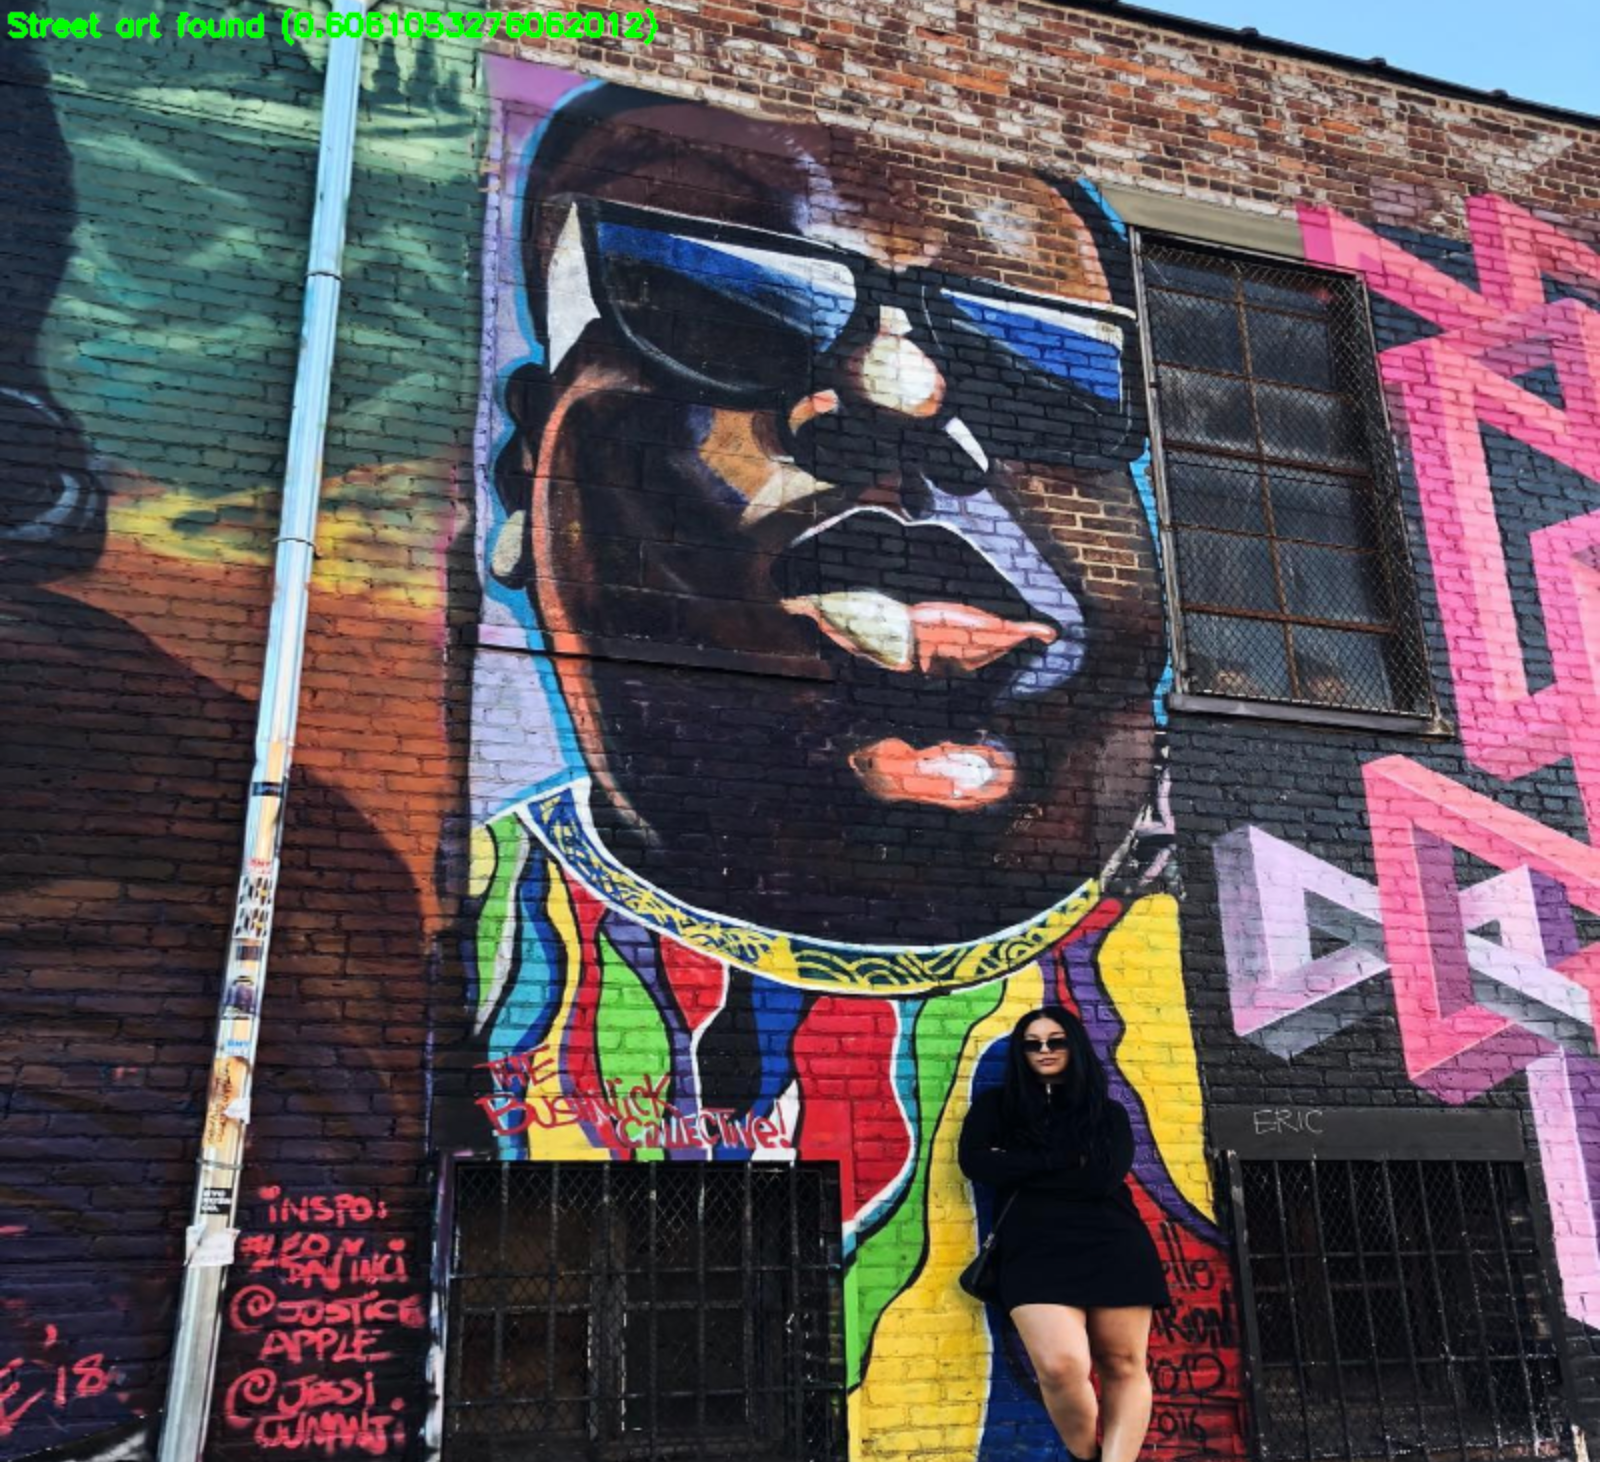
Our image classifier successfully detects street art, as seen in the two images above. Each of the images with a mural painting in the image are classified correctly.
When we run the same classifier against an obviously non-street art images, we receive the high probability “Not street art” result as well.
// Viewing false positives
Some of the false positives from the model are images that depend on a person’s interpretation for street art. Based on the photos we trained against, photos of urban building landscapes and advertisements are incorrectly categorized.
In our case, this hashtag dataset is an imprecise classification system in general, since some people will tag things incorrectly or subjectively.
// Improving the results
Based on our initial dataset of hashtag and location datasets, I got roughly 60~65% accuracy with my training results. I was training on a 1080TI NVIDIA card with a batch size of 32 and 30 epochs over an hour.
To significantly improve this, one concrete step to take is manually review the dataset for the /dataset/images/streetart and /dataset/images/not_streetart. By reviewing the folders content, you can manually delete the images that are incorrectly labeled. In our case, because we pull data from Instagram and are using an undependable primary marker – the hashtags – to determine our dataset, we potentially have the wrong content appearing in the street art and not street art folders.
Once I reviewed the original crawled images, I found many images that had the hashtag streetart, but were not actually street art related. For example, images with no street art in the photo with the hashtag #streetart, which pollutes the model training. Similarly, in the /not_streetart folder, since New York is one of the most popular places for finding street art, I found pictures from the New York City location feed that were actually of street art or graffiti. To clean up the classifier, I had to delete these photos.
// Cleaning the dataset
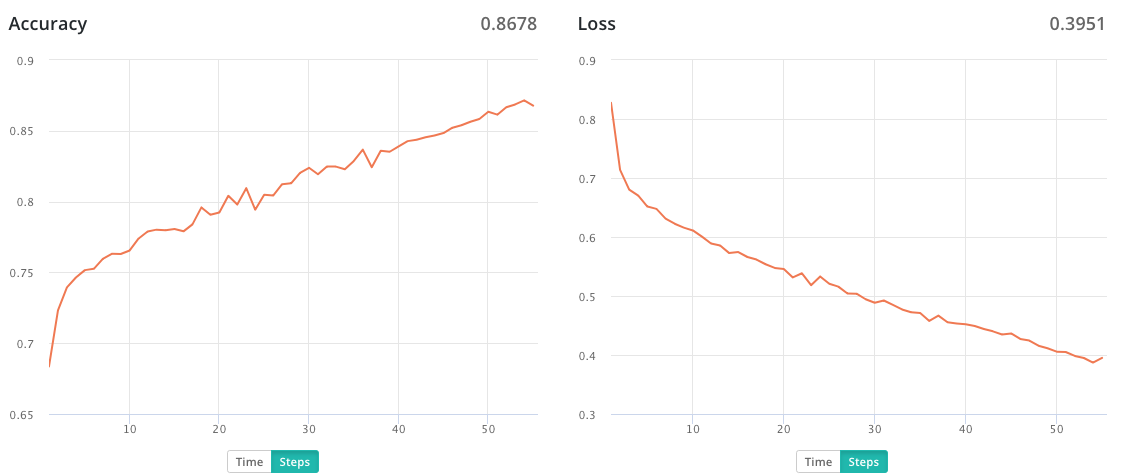
After cleaning up the datasets manually and running the training process again, I was able to achieve an improvement in the model to 80% accuracy. You can see the run data on FloydHub here. FloydHub automatically generates Training Metrics charts for each job when you’re using Keras:
// Next steps for Instagram street art model
This was a practical application of building your own deep learning dataset around a social media source and training a model to classify the respective subject. While street art was the subject of this post, the same techniques could be used for subject of your choosing.
To take this further, the images being analyzed for street art could be segmented to differentiate paintings and their backgrounds. Scene recognition models would be hugely impactful at reducing the false positives caused by various indoor artwork. Similarly, using other models such as the PlacesCNN, we could identify the “street art-ness” that resonates through the finalized model.
If you’re interested in analyzing street art, you could expand this project even further by:
- Get street art images labeled with the artist
- Build a model for categorizing different kinds of street art
- Explore the comment and image description metadata associated to the images with semantic analysis
- Correlate the location metadata on images to find correlations or unique qualities by geography
- Analyzed street art location data to find correlations or trends to social phenomena
- Use the models in production to compare against live location feeds
Thanks to
FloydHub’s AI Writer program and Charlie Harrington for editorial support! Huge thanks to Adrian Rosebrock’s blog for the many code examples used. Thanks to Tyler Cowen’s Emergent Ventures for grant funding to explore this project and the Pioneer Tournament, led by Daniel Gross and Rishi Narang.
About Lenny
Lenny is building a digital genealogy of street art at Public Art. He’s scraping the internet and making a searchable database of street art around the world. One of his project’s goals is to amplify the voice of “protest art” against the constraints of censorship from autocratic governments. He’s also a FloydHub AI Writer.
You can follow along with Lenny on Twitter at @rememberlenny or his project newsletter http://publicart.io.
Links
- Complete code examples
- Building a deep learning dataset with Google Images
- Instaloader
- Prepared dataset used in this post
- PyImageSearch blog post on building a deep learning model for medical image analysis with Keras
- PyImageSearch blog post on saving a deep learning model build with Keras
- PyImageSearch blog post on data augmentation with Keras
- PlacesCNN
- Public Art


